Use the CyBio FeliX flexible pipetting platform to automate gDNA purification from plant leaves.
Kit: Maxwell® HT Fecal Microbiome DNA Kit (Cat.# A6040)
Analyses: qPCR amplification
Input: Plant leaves (fresh or frozen), 10mg
Materials Required:
- Maxwell® HT Fecal Microbiome DNA Kit (Cat.# A6040)
- Isopropanol (about 30ml per 384 samples processed)
- Ethanol (about 20ml per 384 samples processed)
- Sodium hypochlorite solution in water – Pure (5-9% Cl)
- CyBio FeliX Basic Unit with Enclosure (Analytik Jena, Cat.# OL5015-24-100)
- CyBio FeliX Head R 96/250 µl (Analytik Jena, Cat.# OL3316-14-850)
- CyBio FeliX Extraction Set (Analytik Jena, Cat.# OL5015-25-120)
- Tip wash station module (Analytik Jena, Cat.# OL0026-345-24)
- Tip wash trough 96 (Analytik Jena, Cat.# OL3317-11-180)
- Microplate Adapter Soft Touch (Analytik Jena, Cat.# OL30-7215-790-24)
- MicroFiber Filter (1 per 384 samples processed) (Analytik Jena, Cat.# OL5021-25-615)
- BioShake 3000-T elm (QInstruments, Cat.# 2016-0517) with Microplate adapter – Flat bottom standard (QInstruments, Cat.# 2016-1021)
- Magnetic Plate, 384 Well (V&P Scientific, Cat.# VP 771G-4AAZM-1)
Plastic Consumables Used Per 384 Samples:
- 5 x 2ml Nunc™ 96-Well Polypropylene DeepWell™ Storage Plates (Cat.# AS9307)
- 3 x CyBio RoboTipTray 96/250 µL DW; PCR certified, pre-sterilized, filter (Analytik Jena, Cat.# OL3810-25-669)
- 2 x Nalgene™ Disposable Polypropylene Robotic Reservoir (Thermo Scientific™, Cat.#1200-1300)
- 3 x 150 ml Reagent Reservoir Base, 8 per (Integra, Cat.# 6301)
- 3 x 150 ml Reservoir, 100 Bulk Reservoirs, Sterile (Integra, Cat.# 6318)
- 2 x Deepwell Plate 384/200 µL (Eppendorf, Cat.# 0030525108)
- 4 x FrameStar® 96 Well Skirted PCR Plate (4titude®, Cat.# 4ti-0960/C)
CyBio FeliX Method: Plant DNA_v1.0.bms
Method Run Time: up to 3 hours 30 minutes (for 384 samples).
Preprocessing Time: about 1 hour and 20 minutes (including 1 hour of incubation).
Protocol:
Notes:
1. This method is designed to process 1, 2, 3, or 4, 96-well input plates. The number of input plates can be selected at the beginning of the method.
2. The method uses a R96 head and the corresponding tips; however, processing is performed in a 384-well format, thereby allowing both a comfortable sample collection and pre-processing in a 96-well format, and miniaturization and reagent/tip saving thanks to the 384-well format processing.
3. The format of the kit can be adapted to your need (here, lysis in 96-well format and processing in 384-well format): contact the Manufacturing & Custom Operations team at Promega (custom@promega.com or www.promega.com/CustomSolutions) if you wish to discuss custom kit format.
4. This method relies on the use of a Tip wash station module, primed with Ultra-Pure Water.
5. This method is composed of three parts, for which the deck setup differs.
6. The 3rd part of the method is optional, and allows to transfer eluates back in a 96-well format whereas they were processed in a 384-well format.
7. More details are also provided in the “Method details” below.
Pre-processing:
1. Collect samples and place leaves in the wells of 1, 2, 3 or 4, 2ml NUNC™ 96-DeepWell plate(s).
2. Prepare a sufficient volume of Lysis Master Mix, according to the number of samples to process, as described in Table 1 below.
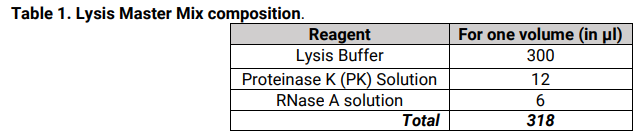
3. Dispense 300µl of Lysis Master Mix per well containing leaf samples.
4. Seal the plate, and shake for 1 hour at 65°C.
5. At the end of the incubation time, centrifuge the plate(s) at maximum speed for 10 minutes, and proceed immediately to the automated purification.
Part 1: DNA binding
Load and run the CyBio FeliX method “Plant DNA_v1.0.bms” and follow the on-screen instructions:
- Select N, the number of 96-well input plates (valid input range: 1-4). The number of input plate(s) is the same as the number of output plate(s) (if any).
- Select whether part 3 of the method (final transfer of eluates back to a 96-well format) is to be performed.
- Thoroughly mix by vortexing the Maxwell® HT C Resin. Prepare a sufficient volume of Binding Master Mix, according to the number of samples to process, as described in Table 2 below. Fill the wells of a 2ml Nunc™ 96-DeepWell plate with [117µl x N + 50µl] of Binding Master Mix, where N represents the number of 96-well input plate(s).
- Fill an Integra 150ml reservoir with [45µl x N x 96 + 4000µl] of Elution Buffer, where N represents the number of 96-well input plate(s).
- Fill a Nalgene™ One-Well reservoir with sodium hypochlorite (bleach, 5-9% Cl) diluted 2-fold (final volume of 80ml).
- Set up the deck as illustrated in Figure 1.At the pause, part 1 ends. Process with part 2 of the method.
At the pause, part 1 ends. Process with part 2 of the method.
Part 2: Washes, drying, and elution
Follow the on-screen instructions:
- Fill an Integra 150ml reservoir with [50µl x N x 96 + 4000µl] of Wash Buffer (WBA), where N represents the number of 96-well input plate(s).
- Fill an Integra 150ml reservoir with [50µl x N x 96 + 4000µl] of 80% ethanol (freshly prepared), where N represents the number of 96-well input plate(s).
- Set up the deck as illustrated in Figure 2.

At the pause, part 2 ends. The user is either invited to collect the Elution Plate from position 10 (384-well Elution plate) or to proceed with part 3 of the method, depending on the option selected at the beginning of
the method.
Part 3: Transfer of eluates to 96-well plate(s)
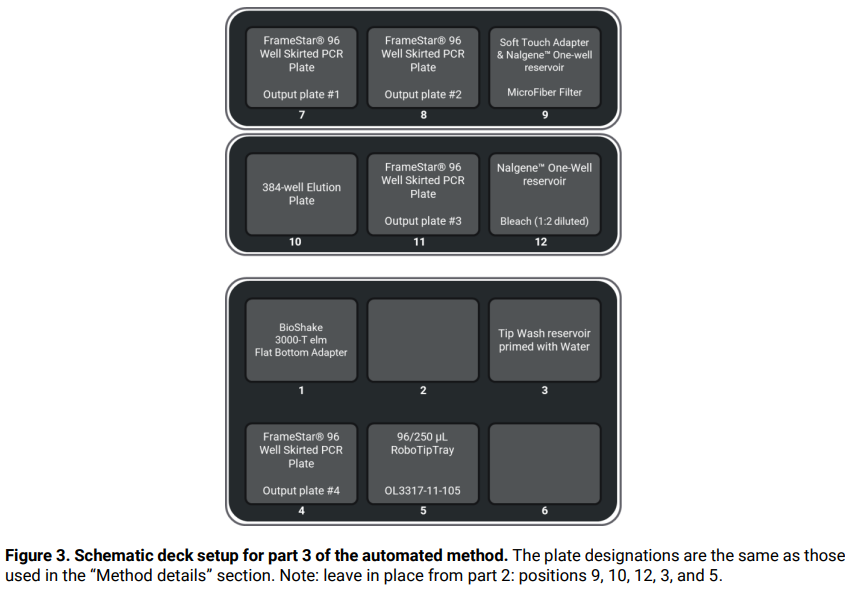
Follow the on-screen instructions and set up the deck as illustrated in Figure 3.
At the end of the method, the user is invited to collect eluates from the output plate(s) in position(s) 7, 8, 11, and 4, as appropriate.
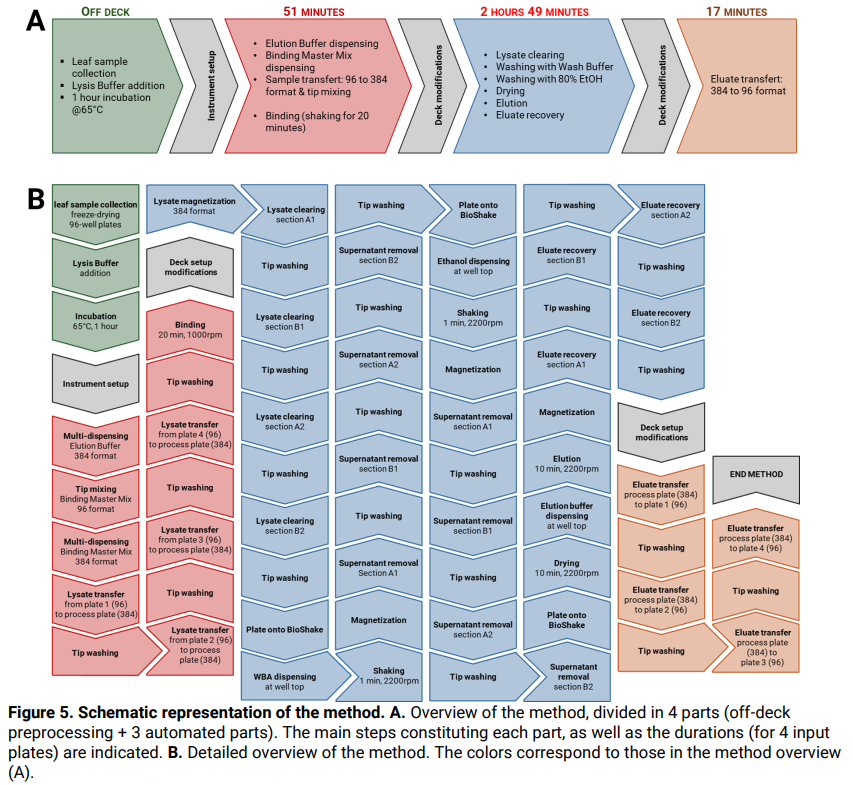
Method details:
This automated method enables users to set up and run a DNA purification from lysed leaves (either fresh or frozen), using the Maxwell® HT Fecal Microbiome DNA Kit. The method uses a R96 head and the corresponding
tips; however, processing is performed in a 384-well format, thereby allowing both a comfortable sample collection and pre-processing in a 96-well format, and miniaturization and reagent/tip saving thanks to the 384-
well format processing. The method consists of 3 parts, for which the deck setup differs and which are separated by a break requiring a manual intervention. The first part consists in format transfer (from 1-4 96-well input
plate(s) to one 384-well process plate) and binding. The second part consists in washes, drying, and elution. The third (and optional) part consists in format transfer (from one 384-well elution plate to 1-4 96-well plate(s)). The
total duration of the method ranges from 1 hour 30 minutes for one input plate to ⋍3 hours and 30 minutes for four input plates.
Notes:
- The user can select the initial number of 96-well input plates (from 1-4), it is the same as the number of output 96-well plates. The method is not designed to perform partial plate processing and will process
plate(s) as a whole, regardless of the presence of input sample.
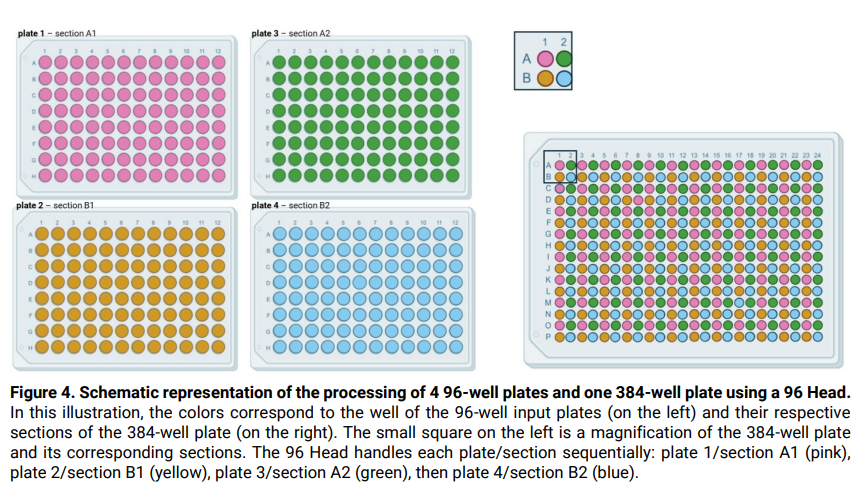
- This method is designed for use with a 96 head: hence, processing a 384-well plate is performed by dividing the plate into 4 sections of 96 wells each (A1, B1, A2, B2, see illustration in Figure 4). Tip washing
between the handling of each section wells, as well as in between some protocol steps, is required to avoid cross-contamination between wells, and is performed by water rinsing (3 cycles), sodium
hypochlorite (bleach) washing, and water rinsing (6 cycles).
- A schematic and detailed view of the method is illustrated in Figure 5.
Part 1: DNA binding
Duration: from 28 minutes (1 input plate) up to 51 minutes (4 input plates), including 20 minutes of incubation time.
User instructions
- The user is instructed to:
- Select N, the number of 96-well input plates (valid input range: 1-4). The number of input plate(s) is the same as the number of output plate(s) (if any);
- Select whether part 3 of the method (final transfer of eluates back to a 96-well format) is to be performed;
- Thoroughly mix by vortexing the Maxwell® HT C Resin. Prepare a sufficient volume of Binding Master Mix, according to the number of samples to process, as described in Table 2 below. Fill the wells of a 2ml Nunc™ 96-DeepWell plate with [117µl x N + 50µl] of Binding Master Mix, where N represents the number of 96-well input plate(s).
- Fill an Integra 150ml reservoir with [45µl x N x 96 + 4000µl] of Elution Buffer, where N represents the number of 96-well input plate(s);
- Fill a Nalgene™ One-Well reservoir with sodium hypochlorite (bleach) diluted 2 times (final volume of 80ml).
- Set up the deck as illustrated in Figure 1.
Automated method
2. The Elution Buffer is aspirated from the reservoir and multi-dispensed in the Elution plate.
3. The Binding Master Mix is thoroughly tip-mixed, and then dispensed into all working sections of the Process plate.
4. Sample is aspirated from input plate #1 and dispensed into the corresponding wells of the Process plate.
5. Sample and Binding Master Mix are tip-mixed.
6. The Process plate is shaken at 1000rpm using the BioShake. In parallel, tips are washed using the tip wash station primed with water.
7. Steps 4-6 are repeated to process all the input plates and the corresponding wells of the Process plate.
8. After the last repetition of step 5, a timer starts for a 20-minute incubation at 1000rpm on the BioShake.
Break: the user is informed that the binding step is complete, and invited to proceed with part 2 of the method.
Part 2: Washes, drying, and elution
Duration: from 1 hour (1 input plate) up to 2 hours 24 minutes (4 input plates), including 2 x 10 minutes of incubation time.
User instructions
1. The user is instructed to:
- Fill an Integra 150ml reservoir with [50µl x N x 96 + 4000µl] of Wash Buffer (WBA), where N represents the number of 96-well input plate(s);
- Fill an Integra 150ml reservoir with [50µl x N x 96 + 4000µl] of 80% ethanol (freshly prepared), where N represents the number of 96-well input plate(s);
- Set up the deck as illustrated in Figure 2.
Automated method
2. The Elution plate is moved onto an empty position (position 10), and the Process plate is moved onto the magnet, and magnetization is carried out for 2 minutes.
3. The supernatant is removed from section-1-wells of the Process plate and dispensed into the trough.
4. Tips are washed using the tip wash station.
5. Steps 3-4 are repeated to process all the working sections of the Process plate.
6. The Process plate is moved onto the BioShake.
7. Wash Buffer (WBA) is aspirated from the reservoir and multi-dispensed into the working wells of the Process plate (at well top).
8. The Process plate is incubated for 1 minute at 2200rpm.
9. The Process plate is moved onto the magnet, and magnetization is carried out for 1 minute.
10. The supernatant is removed from section-1-wells of the Process plate and dispensed into the trough.
11. Tips are washed using the tip wash station.
12. Steps 10-11 are repeated to process all the working sections of the Process plate.
13. The Process plate is moved onto the BioShake.
14. 80% Ethanol is aspirated from the reservoir and multi-dispensed into the working wells of the Process plate (at well top).
15. The Process plate is incubated for 1 minute at 2200rpm.
16. The Process plate is moved onto the magnet, and magnetization is carried out for 1 minute.
17. The supernatant is removed from section-1-wells of the Process plate and dispensed into the trough.
18. Tips are washed using the tip wash station.
19. Steps 17-18 are repeated to process all the working sections of the Process plate.
20. The Process plate is moved onto the BioShake, and incubated for 10 minutes at 2200rpm for drying.
21. Elution Buffer is aspirated from section-1-wells of the Elution plate, and dispensed into the corresponding wells of the Process plate (well top).
22. Step 21 is repeated to process all working sections of the Process/Elution plates.
23. The Process plate is incubated for 10 minutes at 2200rpm for elution.
24. The Process plate is moved onto the magnet, and magnetization is carried out for 90 seconds.
25. Eluates from section-1-wells of the Process plate are transferred to the corresponding wells of the Elution plate.
26. Tips are washed using the tip wash station.
27. Steps 25-26 are repeated to process all the working sections of the Process/Elution plate.
Break: the user is informed that the DNA purification is complete, and invited to either collect the Elution plate or proceed with part 3 of the method (if initially selected).
Part 3: Transfer of eluates to 96-well plate(s)
Duration: from 1 minute (1 input plate) to 17 minutes (4 input plates)
User instructions
1. The user is instructed to set up the deck as illustrated in Figure 3.
Automated method
2. Eluates are transferred from section-1-wells of the Elution plate to the output plate #1 (96-well plate).
3. Tips are washed using the tip wash station.
4. Steps 2-3 are repeated to process all the working sections of the Elution plate. Note: the last tip wash step after transfer into the last output plate is omitted.
Break: the user is informed that eluate transfer is complete, and is invited to collect the output plate(s) containing eluates.
Results:
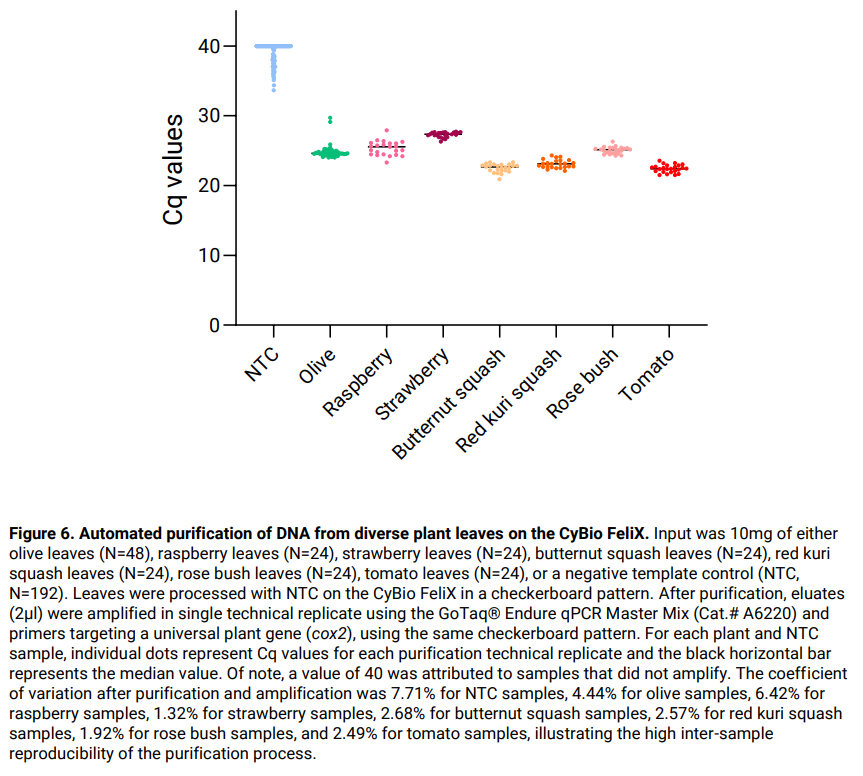
The automated method Plant DNA_v1.0.bms was successfully used on the CyBio FeliX for purification of DNA from diverse plant leaf samples (Figure 6). No cross-contamination was detected.